Butterick 5677, Joan Holloway Colorblock Dress
I have a whole Pinterest board on colorblocking, but one of my favorites is this VPL Lichen Shift Dress ($525). I really love those curved lines and the contrast print rather than using two solids.
I am also into the curves on this Helmut Lang ($485). It makes great use of the colorblocking medium to enhance the figure. While there is much to be said for fun geometric colorblocking like this one, for pure figure flattery, curves are where it's at.
So it was a no-brainer to pick up Butterick 5677 at the first available opportunity. When I got the faille knit I used as the contrast here from Fabric Mart for $1.99/yd a couple months ago, my plan was hatched.
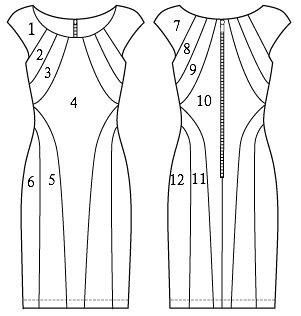
The first thing I did was the write the numbers of the pattern pieces on the back of envelope, as shown at left. I highly recommend you do this, as it makes every subsequent thing easier. The first thing is to choose your contrast panels. In the pattern envelope example, I feel like they went just a bit too far. I have never been a believer in "get all the way dressed and accessorized and then take one piece off." Restraint is not my motto. But I felt by making the sleeves contrast it just went too dangerously close to formal cheerleader category.
If I were to make this again, I think I might combine 2 and 3 in to a single panel and make it contrast. I feel that the upper slice of contrast in panel 3 is too thin compared to the width of panel 5 on the lower half.
To make sewing easier, I wrote the pattern number on the back of the cut fabric pieces. Make sure you do this in a chalk that wipes off and/or won't show through!

The dress does not come with full length sleeves, just the cap sleeves in the line drawing. As it is made with ponte/double knit, however, it seemed to me suited to be a long-sleeve dress for cooler weather.
Because the sleeves are cap, you can't just lengthen them, you have to draw in the lower curve of the armscye. This took me SO LONG to figure out. I really do not have a 3D mind.
Eventually I got the sleeve pattern figured out, marking the shoulder, neckline, sleeve hem, and joining with piece 2 (front) and 8 (back).
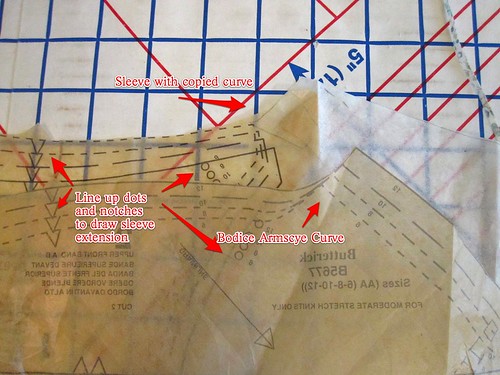
Then I used the helpfully included lining pattern to draw in the lower armscye curve. After I finished I realized it would have been easier to use the connecting piece (2 or 8) that completes the armscye. You can see here how the copied lower curve is the same as the bodice.
You can see both sleeve pattern pieces here

There are a lot of seam intersections in this pattern. I was impressed with how well all the pieces fit together, which is my general experience with the Muse line. They are well-drafted patterns that sew up nicely.
To improve my odds on the seam intersections, I took a hand-tack at each match point before sewing the seam. A meticulous person would have hand-basted the whole shebang from armscye to the lower seam intersection, but I am not that person. I didn't get it exactly perfect, but the match is pretty darn close.
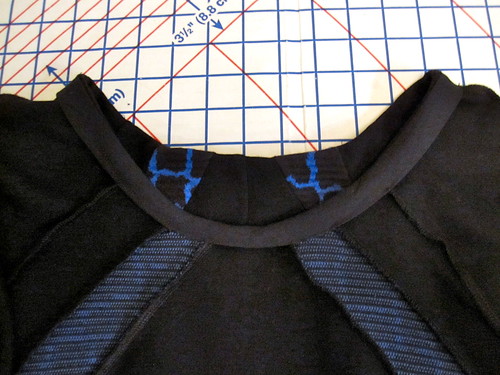
The dress is meant to be lined, and the neckline (and armscye, on the cap sleeve as drafted) is finished with the lining. Lining a double knit seems unnecessary and would add bulk so I skipped that.
The neckline is fairly wide, and needs to be snug in order to fit closely. I first tried to finish the neckline with a facing, drafting from the lining and sleeve pieces, but it was just too bulky and a little stretched out (operator error).
I never would have considered finishing a knit neckline with a woven bias tape until Amanda suggested it on her blog, but in this instance it was the perfect solution. The neckline more than ample to pull over the head without stretching, and it needs to be very stable.
I used this tutorial to make a giant pile of bias tape. I think my math is correct here. I used a piece of fabric about 54" x 22". Using length times width, the area of that piece of fabric is 1188 inches. I then reduced the width to 2 1/4" (the width of my bias tape--I prefer a wider bias tape), making the length...528 inches, or more than 14 1/2 yards. That is a lot of bias tape, my friends.
I did not use Amanda's (very neat) method for finishing. I folded my bias tape in half and sewed the raw edges together to the right side of the neckline, slighting easing in the neckline as I did so; the bias tape is probably about 1/2 inch shorter than the neckline. Then I turned under the bias tape and pressed. I hand tacked the bias tape to each seamline. It stays in place nicely and gives a flat, snug finish on the neckline. So much better than my disastrous facing.
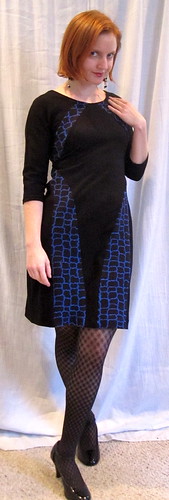
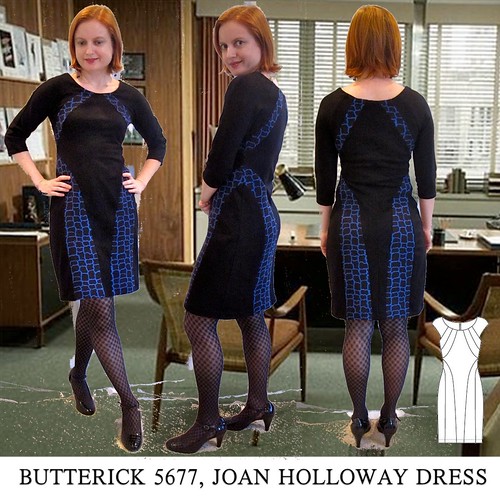
Totally dig the dress, and it is just as I imagined. The only thing I'd change in the future is to combine panels 2 and 3 (and 8 and 9). The upper contrast strip looks skimpy and unbalanced compared to the width of the lower contrast strip. Combining those two pieces would be just about perfect, I think.
I was highly impressed with the fit out of the envelope. The only changes I made were to do a swayback tuck in the center back, and to add an 1.25 inches to the length. Keep in mind that I am a shortie. My final hem ended up just about at the cutting line on the pattern. This is drafted SHORT.
I see that I still don't have a perfect fit in the back (it seemed good in the mirror, but the photos say otherwise). I think I need to pin piece 11 to the back (piece 10) and take a little swayback width out of that as well.

One of my friend's husband's bands (The Burning Hearts) was playing a show on Friday and I wanted to wear the dress. I'm not going to lie to you, I wore it out with the horrible faced neckline.
The boyfriend approved, asking if I had worn my rock'n'roll dress for the occasion. I played along like it was a rock'n'roll dress, but really it is so Joan Holloway! (I couldn't resist the opportunity to put myself in an office at Sterling Cooper in my thumbnail photo.)
I am just now watching Mad Men on Netflix. I was kind of annoyed before at how everyone was all, "Oh, Joan!" but now I totally get it. She is confident and sexy, but not in any way cheap or insecure. If Joan were plopped down in the here and now, I feel this is totally what she'd wear. It's all about curves, but is completely covered up and tasteful. It's all about illusion.
I'm not sure I'll make another of these--it's quite distinctive and colorblocking has a habit of looking extremely dated fairly quickly (judging by 80s colorblocking). But I suddenly had a vision of one in orange, red, and hot pink for summer. So dynamite. If only I knew a reliable source of good quality double knit in a million colors...
All photos are here and the pattern review is here.


Comments
Post a Comment