Burda 09-2007-120, Tie Neck Blouse

Several years ago, I think in 2006, I answered an ad on Craigslist for fabric. It was a woman who ran a vintage store. At one point, they had made tote bags to sell but she had apparently burned out on making tote bags. She had collected a *lot* of fabric to that end (ah, how I know about collecting fabric). Most of it was junk and/or not to my taste, but I picked out a few pieces. The prize length was this groovy 1970s turquoise and green print. There were 2 yards of very narrow fabric, and I could never find the perfect pattern.
After my pants muslin disaster, I needed a trusty old faithful project. Plus, January is the Pattern Review stash contest, which I like to use as a challenge for sewing up older pieces. So I made a skirt (to be revealed soon). But then I realized that I only had a couple tops to match it. So I went stash diving and came up with this prized vintage fabric, that I had actually forgotten about, I admit.
 |
| MARC BY MARC JACOBS Top - Hot Dot Print, $228.00 |
In considering patterns I found Burda 09-2007-120. At first I was torn because the pussybow blouse has been having a looong moment and I didn't want to make something instantly out of style. The trend is still going strong, as you can see in these two pieces from Bloomingdales, but I just knew I would give it the kiss of death.
 |
| Rachel Zoe Long Sleeve Plunge Tie Collar Blouse $295.00 |
But the more I thought about it, I realized that the fashion aberration is actually when the pussyblow blouse is *out* of style. It was standard office wear for women from the 50s through the 80s in various incarnations. It was only the 90s through early '00s that it was out of fashion, though admittedly it was desperately so during those decades. I don't have a classic example in my wardrobe (only two high-neck side-tie variations, Burda 02-2008-119 and McCall 5708) so I decided to take the plunge.
The pattern is drafted for jerseys. It looked to be drafted with enough ease to work in a woven, possibly with a zipper under the arm, but I wanted to test it out first before cutting into my precious fabric. I ordered the cotton floral paisley lawn from Fabric.com in May 2010 and was extremely disappointed when it arrived. I thought the paisleys were small, but they are huge! Also, I thought the color scheme would be more on the orange/yellow/red side, but instead the most prominent colors are Christmas red and green. So I figured no great loss if the cotton lawn version didn't work out, and the fabric would be out of stash either way.
The reviews flagged two things. First, the neckline is way way WAY low, even for Burda. I raised it an inch, which was about perfect for the cotton lawn version but not quite enough for the lighter-weight vintage fabric (it's some sort of semi-sheer nylon).
The second thing is that everyone mentioned the directions for the tie neckline are extremely confusing. So I didn't even bother to read them and just did it my way.
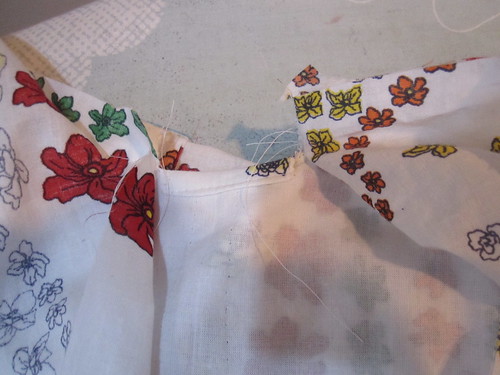
First, I clipped into the seam allowance at the markings on either side of center front and turned and stitched down the fabric to finish that short edge, as seen at left. Here's what it looks like on the outside.
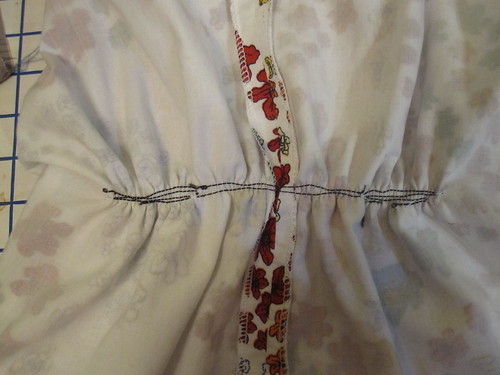
Next, I sewed the tie to the wrong side of the neckline, gathering where marked. In this version, I discovered that the gathering was too concentrated to be flattering to my bust and increased the area over which the gathers are spread (marking the new spot on the front pattern) for the vintage fabric version.
When I am doing any kind of binding, waistband, or other finish like this I always sew to the wrong side first. Then I turn to the right side and topstitch. SO much easier than trying to catch the underside of fabric while stitching in the ditch, and quicker than hand-stitching. You have to be ok with a topstitch look, though.
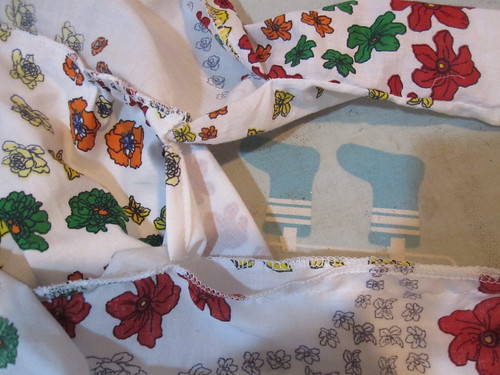
Once the tie was sewn to the wrong side of the neckline, I finished the free ends of the tie by folding right sides together and sewing to within an inch and a half of the neckline, then turning and pressing the tie. The picture at right shows the tie sewn to the wrong side of the neckline and the tie ends finished.

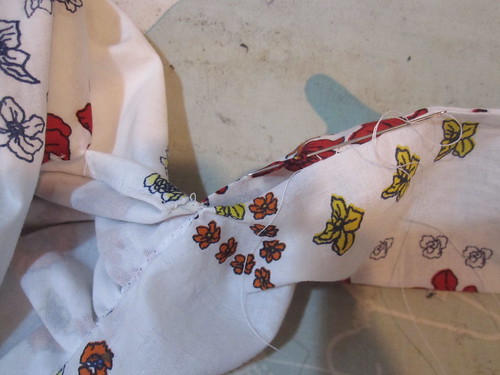
Next, press under the remaining free edge of the tie, which be will folded over to the right side of the neckline.
Fold the tie over to the right side and pin in place, making sure that your pressed-under edge overlaps the stitch line from sewing to the wrong side, so that first stitch line will be hidden.
Topstitch in place, close to the edge.
The last step is to close the little gap left in the tie with some hand-stitching. In hindsight, I probably could have sewn the free end of the tie all the way up to the neckline and still been able to turn it easily enough. But a couple inches of hand-stitching never killed anyone.
For the cotton version I cut the tie as drafted, but it is too short to tie into a bow. On the vintage version, I cut the tie on the cross-grain (due to limited fabric) and cut it as long as possible, an addition of 10 inches to the length. It is good for tying a bow.

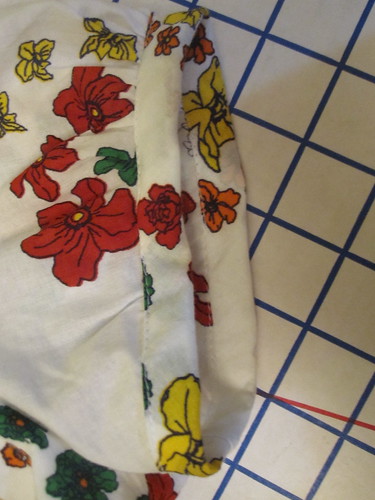 I used the same method to bind the edges of the cap sleeve. To make the puffy sleeve, I pinned the sleeve pattern in place and then just sort of extended it at the sleeve cap and the bicep. Not very scientific but it worked.
I cut bias strips for the edges and pressed them into double folds. I lined up one cut edge of the bias strip right side against wrong side on the inside hem of the sleeve. Stitched in place, the folded the other end over to the front, the pressed edge overlapping the first line of stitching. Topstitch.
With my wearable muslin, I found that although the pattern had been drafted for jersey it definitely had plenty of ease to be sewn in a non-stretch woven, and did not need any kind of closure.
In fact, it was a little too roomy. Because the cotton lawn is meant to be a Spring/Summer top, I knew the volume could not be controlled with belting. A belt in summer is like strapping a mini-sauna around your waist. The sweat is horrifying. So I ruched a couple of rows with elastic thread in the bobbin at waist level over the side seam. LOVE elastic thread ruching. So incredibly easy. Much easier than actual fitting, lol, and much less sweaty.
Before I set the cap sleeve into the lawn version, I cut a sleeve muslin of the long sleeve. This was the one area where the drafting for jersey was a problem, as I found it very constrictive.
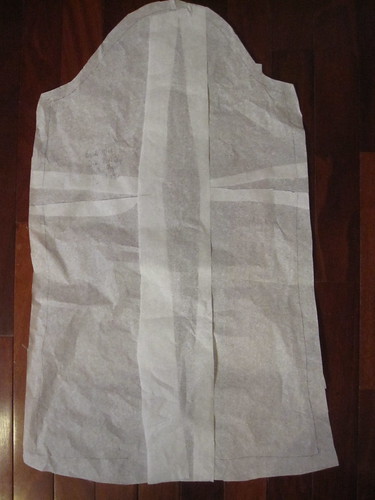
I did a full bicep adjustment by splitting the sleeve up the center to the sleeve cap, leaving a hinge. I spread this open, and then cut from the sleeve seam to the split at the bicep level, leaving a hinge at the center split. On these hinges, I rotated the lower part of the sleeve so that the original hem width was preserved, and then filled in the spreads with tissue paper. There is plenty of room in the final sleeve, though I could have used a slightly larger broad back adjustment for a fuller range of motion through the arms.

For the cotton lawn version, I underlined with cotton batiste. With the vintage version, I didn't want to lose the flow of the fabric. I lined it with a lightweight silk (china silk or habitoi weight) that has been in stash for who knows how long--I bought it based on a painted silk dress project shown on Craftster (lost in the mists of time) that involved stringing a length of silk into a clothesline and using watered down paint to let it drip down in lines, knowing that I don't actually have anywhere to do silk painting like that! There's a limit to what I'm willing to do to my bathtub.
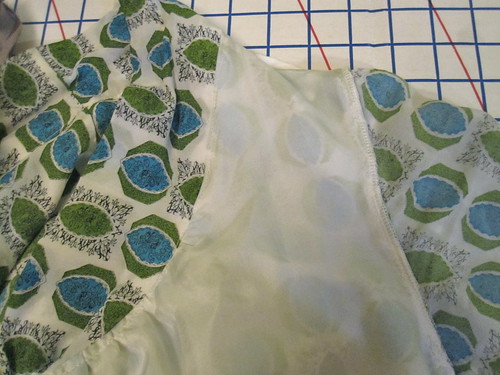
I sewed the center back, shoulder, and side seams of the fashion fabric and lining with French seams. At the armscye and neckline I joined the two layers and treated them as one. Paco just did a great tutorial on special seaming for transparent fabrics (UPDATE: Paco kindly published my English translation for the post


I am very happy with both versions of the blouse. The giant paisley fabric is cuter made up than it was as yardage--though it kills me to make a Spring blouse before I can wear it!
In sewing up the vintage fabric, I realized that it is quite fragile and stained. I think it may have been kitchen curtains--there are several large grease/glue spots that I can't get out. So I was saving this precious fabric for years when really the resulting blouse won't last very long.
I considered cutting it single layer and then didn't but should have, as you can see at the CB seam. Oops.
Love the style of the blouse and am wondering how many versions of it I can get away with.
All photos are here and the pattern review is here.


Comments
Post a Comment