Burda 11-2011-120, Ruffle Front Red Dress
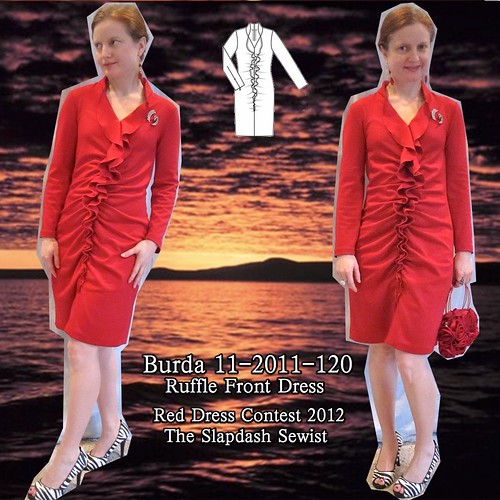
While I have not been loving Burda lately, there is generally at least one piece I like in each magazine. Burda 11-2011-120 immediately caught my eye in the magazine. That ruffle down the front is a great tummy disguiser *and* bust builder--two for the price of one! I sewed it in some red double knit I bought in NYC in November 2010 for $2/yd--a huge bargain as the fabric is quite nice.
This dress comes in sizes 38-46, meaning I had to grade down 2 sizes to a 34 at the shoulders and bust. Grading two sizes on the (not so) new roadmap pattern sheets makes me want to claw my eyes out. While I have kept up my Burda subscription, I sew way more from old issues than current ones, so the new pattern sheets are always an ugly surprise when I pull out a newer issue. I think that is part of the reason they have gone to 80% sack dresses--they're the only thing that isn't horrible to trace.

This pattern only works for fabrics with no discernible wrong side. The center front seam is sewn wrong sides together several inches from the edge of the fabric and the extra "seam allowance" forms the ruffle. I made view B, on which the ruffle ends several inches above the hem. On View A, it continues all the way down.
To mark the center front seam, I stuck pins into the pattern piece and cut fabric at about 4 inch intervals at the marked seam line. I folded back the pattern at each pin in sequence, marking at the pin on both left and right front. Be sure to mark on the *right* side of the fabric, as you will eventually be stitching on the right side.

The pattern comes with the choice of a fairly standard band collar and a more dramatic high collar. I went for drama.
I ignored Burda's directions for the collar, mostly because I didn't want to puzzle them out. They involve something to do with trimming the allowances off the undercollar and finishing it with ribbon. In the end, I probably should have tried to decipher them, or come up with a different method because the finish is not great.
First, I stitched the outer collar to the neckline, stopping at the stitch marking on the end. Next I sewed the under collar to the outer collar, again stopping at the stitch marking as you can see in the photo. After both collars were sewn on, I trimmed the ends beyond the stitching.
(BTW, pay no attention to how horrible the finish is on the ruffle. I bought a new serger in the middle of this project and had it overnighted because I was so impatient to finish the dress! The old finish was trimmed off and a put in a fabulous new rolled hem. More on the new serger later.)

To finish the collar, I hand-stitched the under collar to the allowance. However, because the seam comes to a point at the end I had to roll the under collar over and the raw edges are not enclosed at the very end. I don't like the way it looks.
In the end, I'm not sure I know a better way to finish a collar like this that tapers to nothing at the end (a facing isn't possible because of the way the ruffle is formed). If I make this again, I will just use the traditional band collar, which has enough height at the end to tuck the seam allowance up into it.
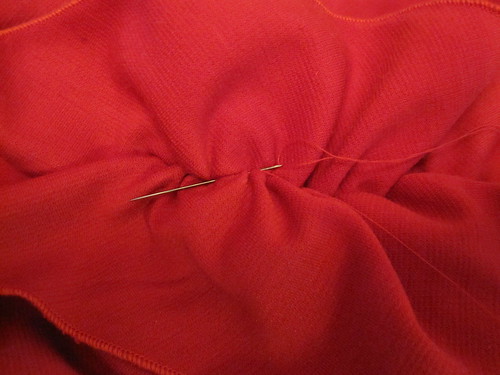
To gather the front ruffle, I ran machine basting stitches on either side of the ruffle. I tried on the dress and adjusted the ruffles to my preference. Burda gives the length to which the ruffle should be gathered, but I wanted to distribute the gathering in the most flattering way for my body.
Once the gathering was in place, I pinned a ribbon to the underside of the ruffle, per Burda's instructions. Then from the front I stitched in the ditch by hand, catching the ribbon, as you can see in the photo (here is my line of hand stitching). You could definitely use the machine for the this step, but I always have a hard time making sure I'm catching the ribbon on the underside in this sort of situation and hand sewing gives better control.
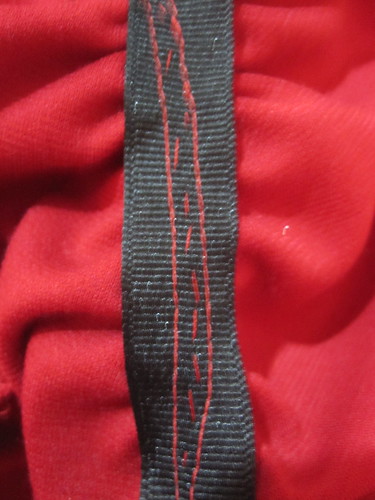
I was concerned that my stitch-in-the-ditch wouldn't necessarily hold the gathers exactly as I wanted them, so I next ran a line of machine stitching on either side of the CF seam, between the seam and the row of gathering thread. With three rows of stitching on the ribbon, I feel confident my gathers will stay in place!
I might have taken up a little too much length with the ruffle, as the center front seam below the ruffle was poking out. I took in about half an inch along that seam at the hem, but it still doesn't sit great.


When contemplating the dress, I feared it would be a wardrobe piece of little utility because it would be too vavavoom for work. As it emerged from under the needle, though, I changed my opinion. It is definitely flattering and a little bit flirty, but I don't think it is outright sexy, especially with the long sleeves (I wouldn't wear those shoes to work--or anywhere I have to walk more than 3 steps).
The pattern is designed for a non-stretch woven, and I did not make any changes to fit to account for my double knit. Therefore, the final result has a fair amount of ease. I kept it that way because I did not want it too fitted for work, but I might go back and take it in a tad more at the side and center back seams, as it is almost droopy in places.
I am also half-tempted to rip out the sleeves and shorten those way way WAY too long shoulders. I am working on developing a TNT tee, and the shoulder seams on the tee are seriously about 2 1/2 inches long. I have very narrow shoulders.
I finished the dress in time for Valentine's Day and it was properly appreciated. I totally love it--it is a great style for me. I'm even thinking of making a sleeveless version for summer. Maybe in a cute print? Though it's hard to find a print that looks good on both sides of the fabric.
All photos are here and the pattern review (my 250th!!!!!) is here.


Comments
Post a Comment