Gathered-Hem Sleeve Variation
A couple of months ago I was walking down the street and saw a woman in a nice professional dress, a well-fitted sheath with a flattering sleeve gathered into a hem band. Or so I thought. When I got closer I saw that while the center of the sleeve was gathered as though into a hem band, the sides of the sleeve were not gathered and, indeed, did not have a seam. I was so intrigued that I nearly circled her trying to get a good look.
For some reason I have a thing about basic, standard sleeves. I make them, but they bug me. I guess I feel like I should be more creative than that? Anyway, I had to figure out these sleeves. It took me some cogitating, but I finally envisioned how it had been done.
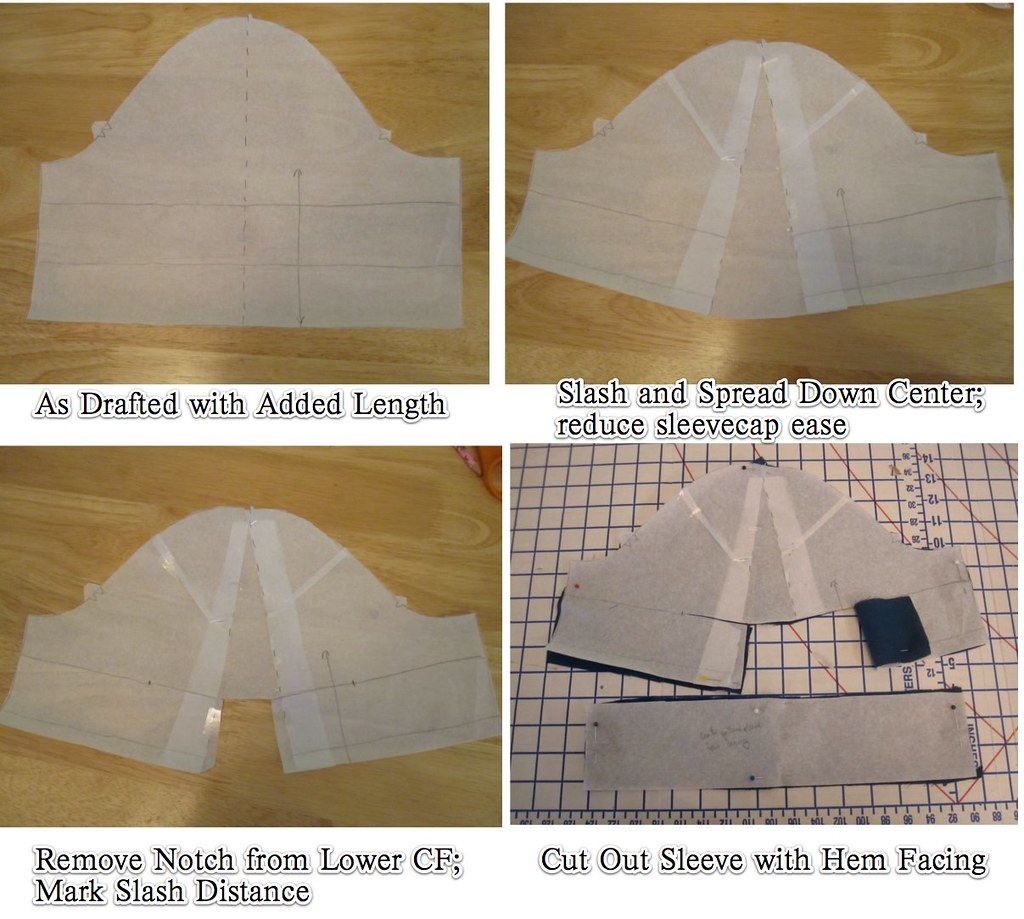
I started with the basic short sleeve. I added two sections of length, one for the integrated hem band one one for the hem facing (I cut off the hem facing piece and used it separately).
Next, I marked a line down the center of the sleeve, coming from the shoulder marking, and slashed from the bottom of the sleeve up through the seam allowance at the shoulder. This being a Simplicity pattern, I also took the opportunity to take out some of the ridiculous sleeve cap ease favored by the Big 4.
I filled in the spread area with tissue, then cut out a notch from the integrated hem band section. This is to give extra fabric above for gathering. Then I marked the slash lines at the original sleeve length, 3 inches from the center on either side.
You can see the slashed area in the cut out sleeve.
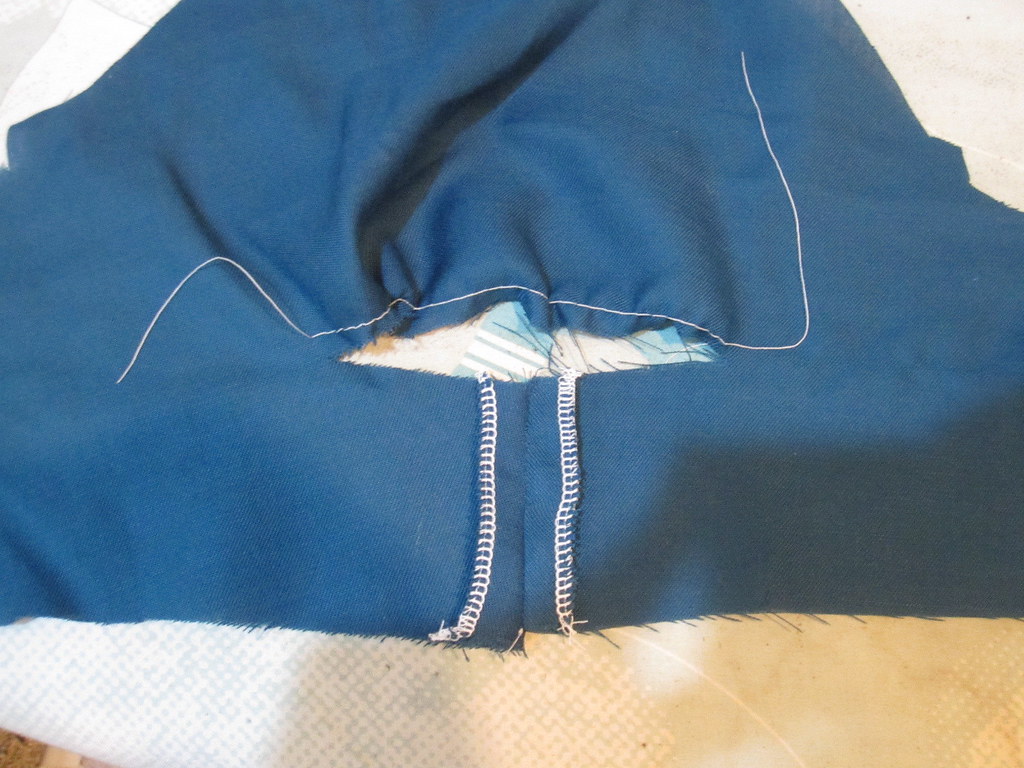
To construct the sleeve, first sew the center seam in the integrated hem band.
Then put in a gathering stitch on the area above the slash, about 1/4" from the edge.
The fabric I was using for muslin was rather shreddy. If I was using a fabric like this for my real garment I'd probably zigzag it before gathering.

Pull your gathering thread (you can see I just used one row of stitching for this short area) to match the lower edge.
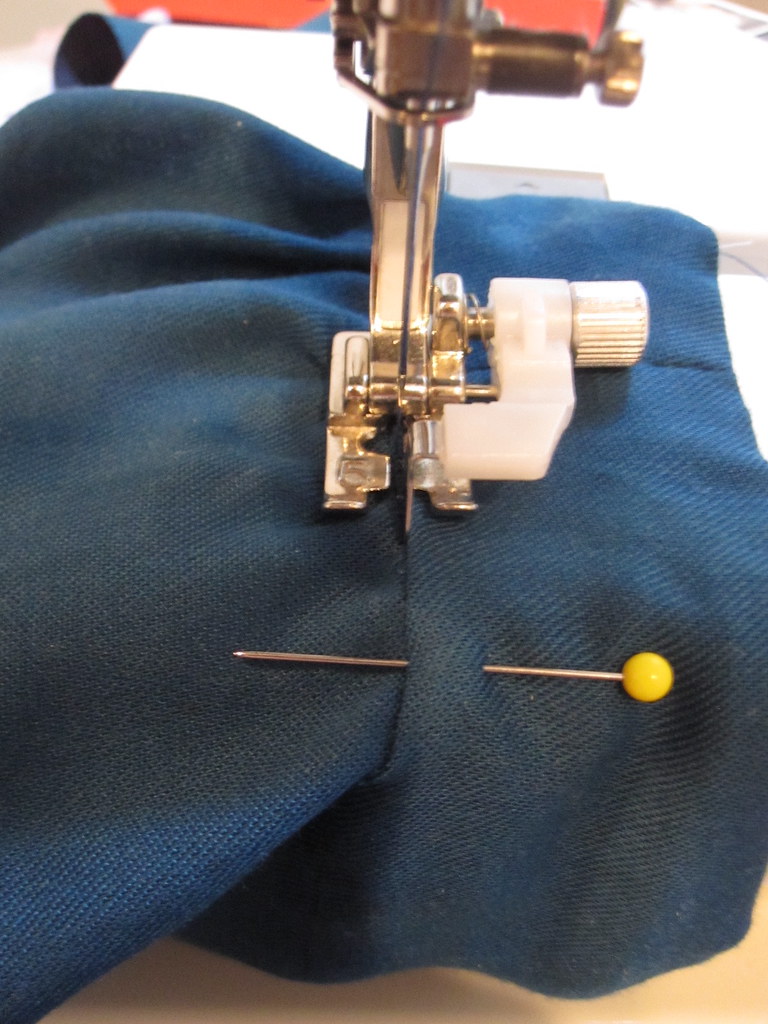
The seam is sewn like a fisheye dart, tapering at each end.
The real trick is taking a tiny seam allowance so you don't distort the length of the sleeve.
I zigzagged the edges together once it was sewn--no room for a serger in there!
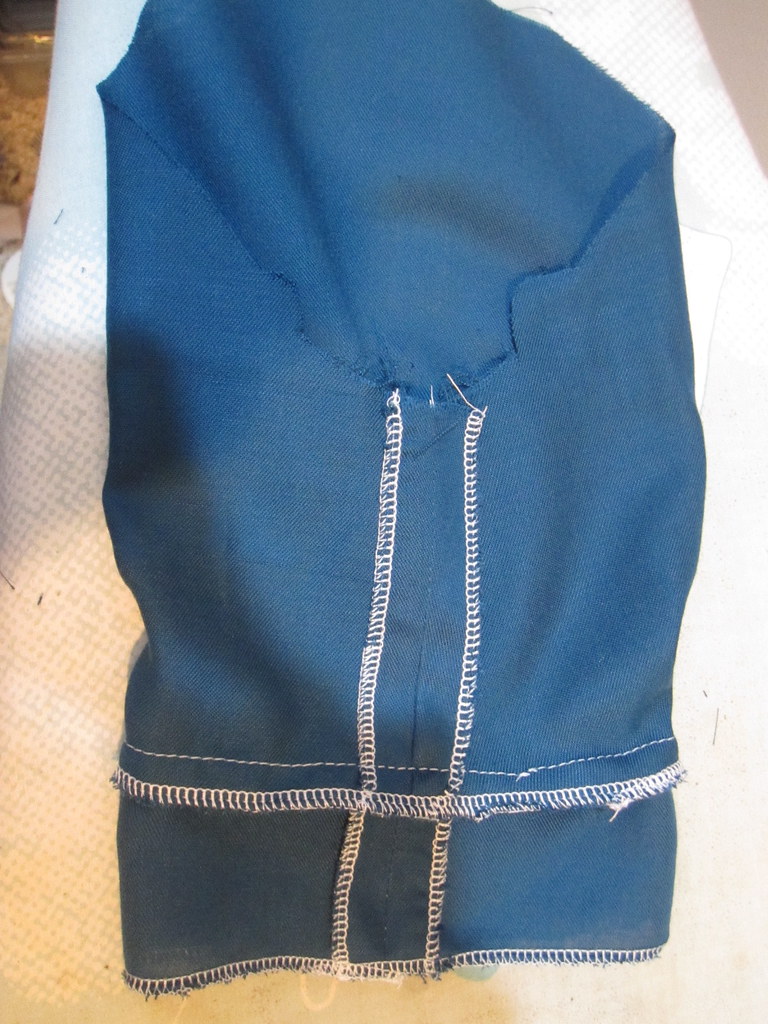
Next step is to sew your hem facing to the lower edge.
My hem facing is just a straight piece of fabric. It might be better to have it slightly curved to match the curve of the sleeve, but it didn't give me any trouble.
The hem facing needs to be long enough to come up above the dart/seam of your gathered section.
Here, you can see that I've turned the seam allowance under. The folded edge will extend past the dart/seam.
For the test sleeve I took the easy way out and just stitched in the ditch along the dart/seam to keep the hem facing in place.
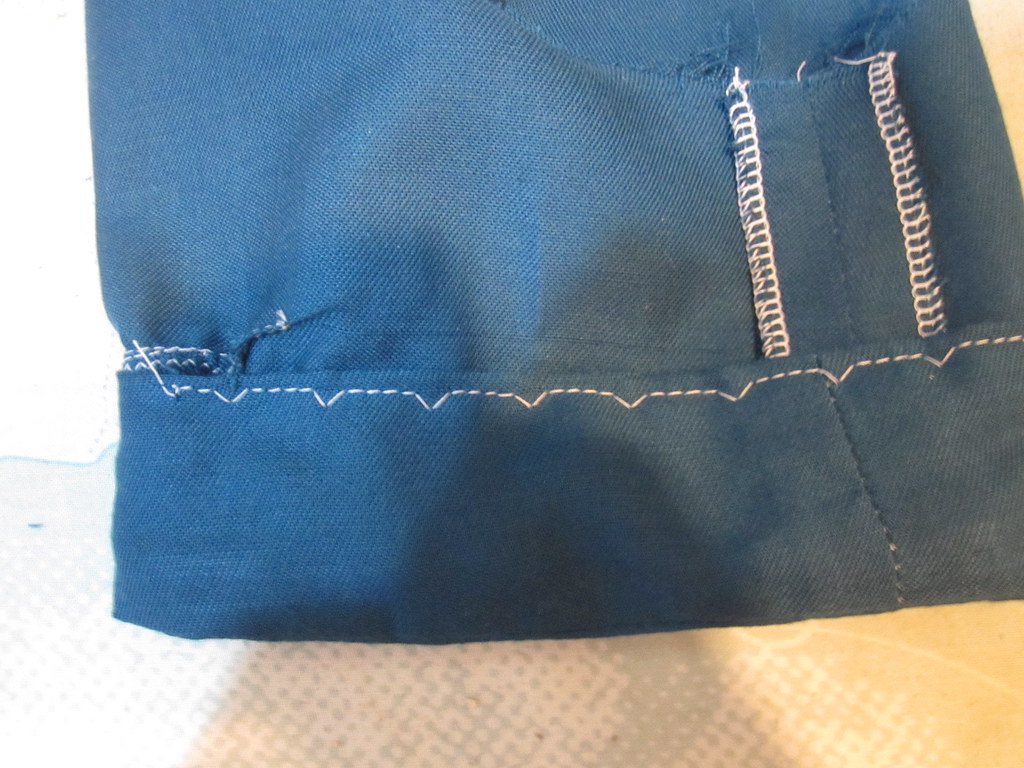
I stitched the rest of the hem facing in place using a machine blind-hem.

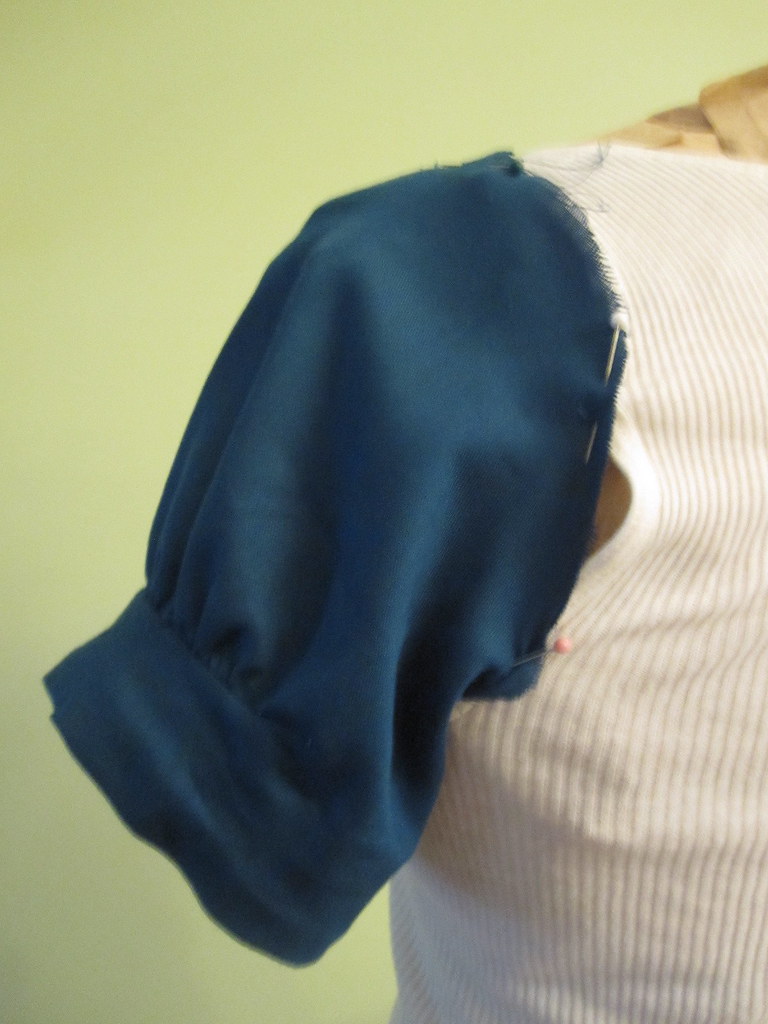
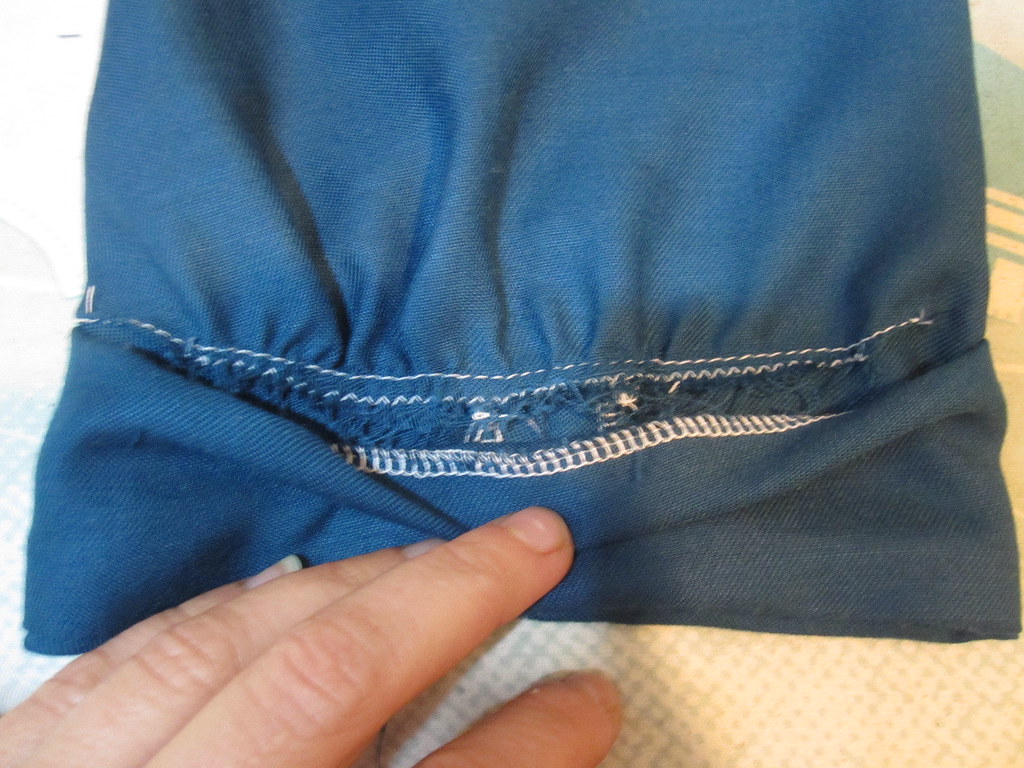
And the finished sleeve! I was very happy that I actually managed to crack this code.
Before sewing it up for the actual garment I made two changes. First, my slash was too long, so that most of the ungathered/unstitched fabric was hidden under the arm. I cut the length in half for the final version.

Second, the integrated hem band sticks out at the center seam. For the final version I trimmed some tissue off the vertical seams of the integrated hem band, starting at the bottom and tapering to nothing at the slash. However, as you can see, I didn't trim off enough and the band of the final version still sticks out at the center seam as you can see in the front shot. So that needs a little more refining.
All photos are here.
You can read about the dress I used the sleeve pattern for here.
For some reason I have a thing about basic, standard sleeves. I make them, but they bug me. I guess I feel like I should be more creative than that? Anyway, I had to figure out these sleeves. It took me some cogitating, but I finally envisioned how it had been done.
I started with the basic short sleeve. I added two sections of length, one for the integrated hem band one one for the hem facing (I cut off the hem facing piece and used it separately).
Next, I marked a line down the center of the sleeve, coming from the shoulder marking, and slashed from the bottom of the sleeve up through the seam allowance at the shoulder. This being a Simplicity pattern, I also took the opportunity to take out some of the ridiculous sleeve cap ease favored by the Big 4.
I filled in the spread area with tissue, then cut out a notch from the integrated hem band section. This is to give extra fabric above for gathering. Then I marked the slash lines at the original sleeve length, 3 inches from the center on either side.
You can see the slashed area in the cut out sleeve.
To construct the sleeve, first sew the center seam in the integrated hem band.
Then put in a gathering stitch on the area above the slash, about 1/4" from the edge.
The fabric I was using for muslin was rather shreddy. If I was using a fabric like this for my real garment I'd probably zigzag it before gathering.
Pull your gathering thread (you can see I just used one row of stitching for this short area) to match the lower edge.
The seam is sewn like a fisheye dart, tapering at each end.
The real trick is taking a tiny seam allowance so you don't distort the length of the sleeve.
I zigzagged the edges together once it was sewn--no room for a serger in there!
Next step is to sew your hem facing to the lower edge.
My hem facing is just a straight piece of fabric. It might be better to have it slightly curved to match the curve of the sleeve, but it didn't give me any trouble.
The hem facing needs to be long enough to come up above the dart/seam of your gathered section.
Here, you can see that I've turned the seam allowance under. The folded edge will extend past the dart/seam.
For the test sleeve I took the easy way out and just stitched in the ditch along the dart/seam to keep the hem facing in place.
I stitched the rest of the hem facing in place using a machine blind-hem.
And the finished sleeve! I was very happy that I actually managed to crack this code.
Before sewing it up for the actual garment I made two changes. First, my slash was too long, so that most of the ungathered/unstitched fabric was hidden under the arm. I cut the length in half for the final version.
Second, the integrated hem band sticks out at the center seam. For the final version I trimmed some tissue off the vertical seams of the integrated hem band, starting at the bottom and tapering to nothing at the slash. However, as you can see, I didn't trim off enough and the band of the final version still sticks out at the center seam as you can see in the front shot. So that needs a little more refining.
All photos are here.
You can read about the dress I used the sleeve pattern for here.


Comments
Post a Comment