Burda 08-2011-120, J. Mendel Knockoff Birthday Dress

 |
| Jason Wu |
I have collectively spent much more time on Pinterest than on actually making things inspired by Pinterest, but add another project to the list! I was really struck by this $2590 J. Mendel dress--I love the contrast raglan sleeves, trim down the front, and full-skirted shape in a sophisticated fabric. I thought it might be a good use for the remainder of the silk suiting I used for my A line skirt. Then I saw Burda 08-2012-120 and knew it was fate. I used the skirt from Butterick 5315, which I meant to mention at the time was very nicely drafted. It fit on the bodice with no changes, cutting size 10 at the waist. After I'd made it, I saw the Jason Wu at left in a similar style.

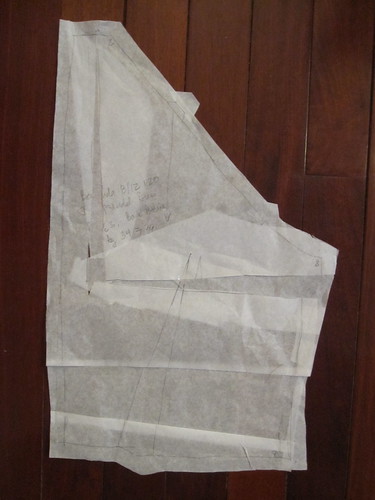
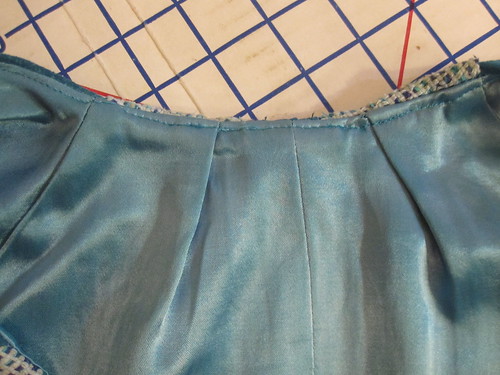
I first made my broad back and small bust adjustments and then made a quick muslin of the bodice (these are the final pattern pieces, after taking length out of the bodice and adding width at the center front and side seams).
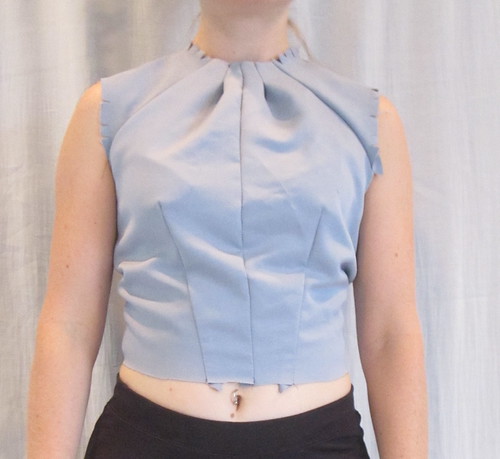
The fit was pretty good and I had good movement in the arms. The neckline was way too high in the front and it was a little long in the bodice--not surprising as this is a tall pattern. The front bust darts were very long. I lowered the neckline half an inch and shortened the bodice by about 3/4 of an inch about 4 inches above the waist. I could have shortened it a bit more for my less-stable fashion fabric. I had a little droopiness in the front bodice at the side seams at bust level, so I shaved a little width off there. I also added a little width at the waist, but ended up taking it out during construction (probably to do with the less stable fabric).

To make it less confusing to put together, I found it useful to add notches to the sleeve and bodice pattern along the sleeve/bodice join line. There are notches (well, markings, this being Burda) drafted onto the bodice pieces, but only to indicate the terminus of the sleeve. It was a lot easier to keep the front and back straight, and which edge lined up where, with the notches.

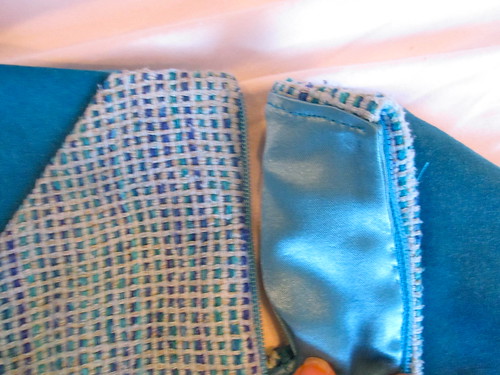
The suede comes from a large jacket, purchased at the thrift store last year for $10. I was hoping that I could remake it into a jacket to fit me, but it just wasn't big enough for that, alas. In taking it apart, I was interested to see how much interfacing has been used in it. There were strips of interfacing at the armscyes, for instance.
I used my Chaco chalk liners, a recent indulgence, to mark the patterns onto the suede for cutting. These things are awesome. They have a teeny tiny wheel that dispenses the chalk in a line, and you can zip right along with them. I thought I had taken a picture of my traced pattern pieces but I hadn't sorry.
For the front trim, I cut the topstitched seam out of the center of each sleeve (joining the pieces to get enough length) so there would be more interest than just a strip of suede.
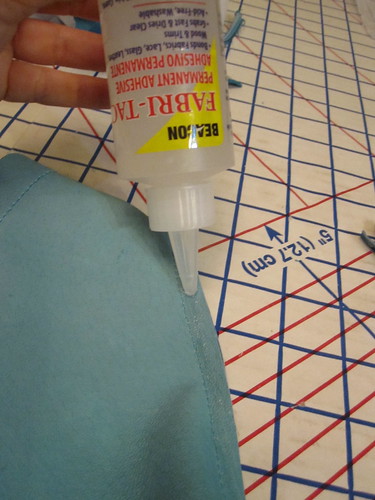
This was my first time sewing with leather or suede. I did not find it difficult at all. I had gathered a lot of information by osmosis from reading about others' projects (particularly Karen's and Clio's) so I didn't do any additional research. For the front trim and the belt I used a leather needle, but where leather was sewn to fabric I just used a universal. This suede was fairly thin and supple and it sewed up totally fine with a universal needle. I used a walking foot for most of the sewing involving suede and glued down the seam allowances with Fabri-Tac.
I finished the bodice using the all-machine clean-finish technique. Because of the thick fabric and front pleats, which add even more thickness, I did the neckline first. I trimmed close to the stitching and zigzagged to finish, rather that using the serger as I normally would, because I could get the seam allowances smaller that way. Then I understitched the neckline to the lining. Once that was all done I stitched the armscye seams. Although the lining does not lay perfectly flat at the neckline, it does not show either so I am satisfied.
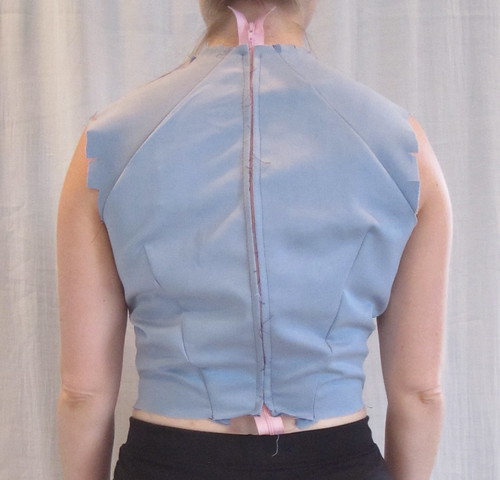
 Because the fabric was too thick for an invisible zipper to cross the waist seam, I did a lapped zipper. I used the same technique as for my Seersucker Social dress, hand-picking the visible/lapped side, though this one didn't turn out quite as well. I think I see why the exposed zipper trend got started--it's just hard to get a regular zipper to look good in some fabrics.
I used a Frixion pen to mark the stitch line for the lap, which made things go a *lot* faster than trying to eyeball it.
I did not interface the zipper opening at first, which was a horrible mistake. I had to rip out the hand-picked side and the second pass machine stitching on the underlap side and retrofit it with interfacing. I was racing against the clock to finish this dress so this was fairly painful. Lesson learned.
On the plus side, I think I did a nicer job with the zipper finish at the neckline.
I didn't have this issue that I noticed with the muslin, but the back neck on the finished version is kind of sticky-outy. I probably need to make it a standard alteration to narrow the back neckline.
Because the skirt is essentially a circle skirt, it needs a very small hem allowance to avoid the agony of trying to shrink the fuller lower edge to fit the narrower stitched edge. I turned it up about 3/8 of an inch and used hem lace to get enough length for a machine blind stitch.
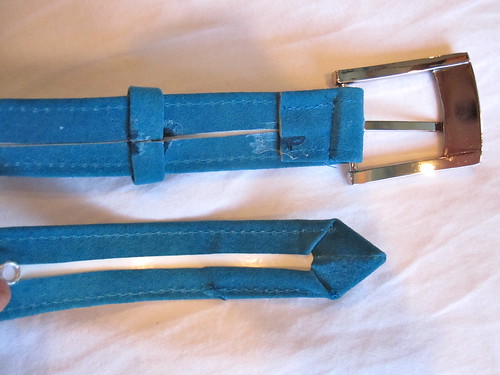
The matching belt is an integral part of the look and I am really happy with how it came out. To get the point at the end, I folded the suede strip in half and stitched diagonally across it, trimming very very close to the stitching, especially at the point. I finger-pressed it flat, then traced the arrow onto the belting. I sort of mitered the corners, as you can see. I used topstitching thread and stitched the suede directly to the belting.
One of the beauties of sewing with leather is it's one of the few instances in sewing where glue is a totally acceptable construction method, LOL. I used glue to create the loop (it's a piece of suede folded in thirds) and to fix the loop to the belt. I happened to have Fabric-Tac on hand and it says it works on leather on the bottle. It seemed totally fine.
I decided to go with a non-covered belt buckle, of which I have a not-insignificant stash for some reason. This buckle is a little wider than my one inch belting--I think the buckle is metric because it's not 1 1/2 inches. So it occasionally requires a little rearranging to keep it from sitting crooked. Any ideas for keeping it straight would be appreciated. I think I should have anchored the tongue thingy before sewing the belt in place, but I don't want to rip out the stitching because I am not confident of being able to sew exactly along the stitch line again--it's hard to get close to the buckle.
I will eventually glue ribbon to the back of the belt to cover up the suede seam allowances, but I don't have anything suitable in stash.
My dress is not exactly like the inspiration--the leather goes all the way around the armscye on the original and (as the name implies) the entire back is leather. But it is quite similar, also to the Jason Wu. So maybe it's only a $1590 dress instead of a $2590 dress. Hee.
I should have underlined the entire bodice in silk organza, as it stretched out a bit vertically from the weight of the skirt while it was hanging before hemming. Alas. At least the suede trim in front and zipper in back will keep it from stretching out further. So I'm annoyed with myself over the stretched out bodice and wish the zipper looked better, but otherwise really like the dress.
Today is my actual birthday but because of the holiday weekend I had my celebratory happy hour yesterday (complete with the fascinator/tiara) and will wear it for a fancy dinner tomorrow. Woot!
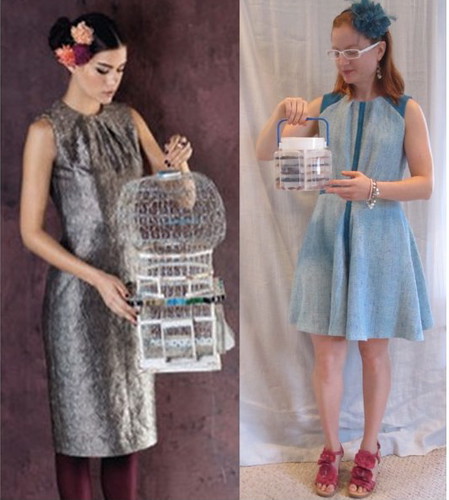
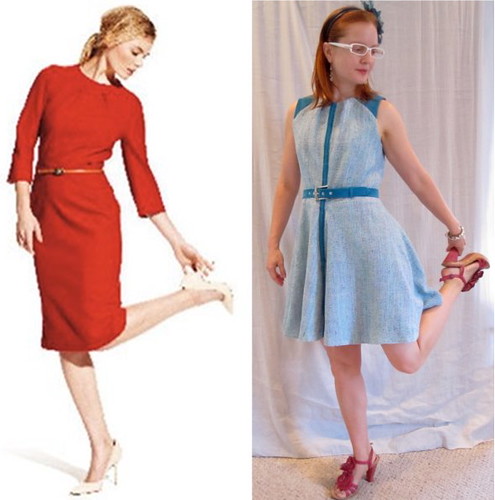
I will leave you with these amusing photos, copying the magazine's poses based on this PR thread. The closest thing I had in my home to a giant decorative birdcage was a button caddy, and I am very impressed with the long-sleeved model's flexibility. I realized that she was merely touching the heel of her shoe; I had to cling onto mine to stay upright during the self-timer lag. Also, I was SUPER SORE from a hard yoga class and long run, so my muscles were all clenching up. It is amusing though. (Some people asked about these shoes in my last post--they are Borns, which are the most comfortable heels possible. I lucked into these at Nordstrom Rack for a crazy price, I think under $30.)
All photos are here and the pattern review is here.


Comments
Post a Comment