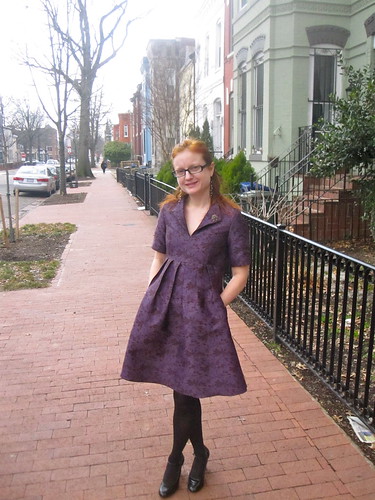
Oscar de la Renta Meets Butterick 5558 Wing Collar Dress
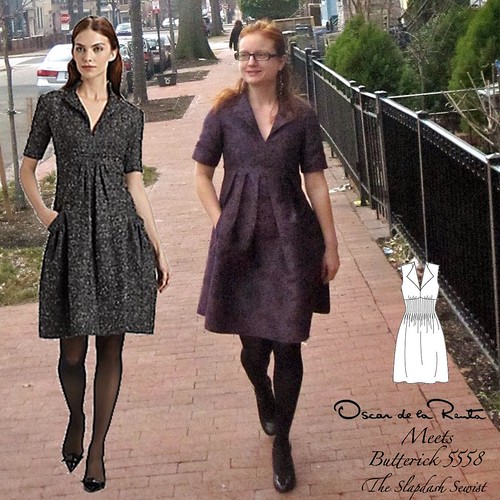
About a year ago this Oscar de la Renta boucle jacquard dress, which was $1890 at Saks (it's sold out, but for the moment is still on the website if you'd like to zoom into the details), caught my eye. The fabric content of the original is poly/acrylic/polyamide, with a silk lining. I looked forever for the perfect fabric. It's tough to find a boucle that is lightweight enough to be pleated, so in the end I went a different direction with the fabric.
My starting point for this was Butterick 5558, which has the perfect collar/neckline and the empire waist. This pattern has only two reviews, which surprises me as I think it is rather cute and purchased it before I ran across the inspiration piece. Having made it, I am impressed with the drafting of the collar/neckline and recommend it.
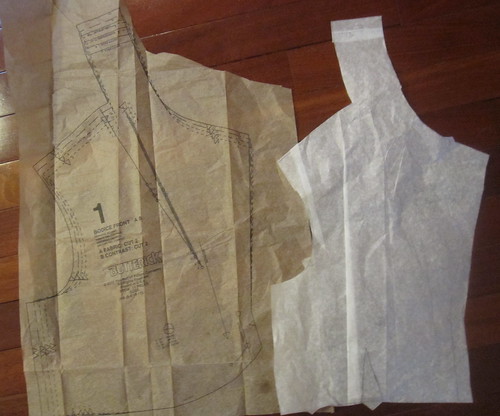
B5558 is drafted with a peaked center front skirt, while the inspiration's bodice is straight across. I prefer the straight across look. The bust shaping as drafted comes from gathers; the inspiration has a dart. Luckily, B5558 comes with a nicely drafted facing/lining for the bodice, and the lining has darts rather than gathers. Two darts is too much for my bust, so I eliminated one of them, folding out the extra width (and did the same on the lining).
After a couple of hours of tedious re-drafting, I ended up with a front bodice that cuts straight across and has a dart.
The inspiration piece has pleating in the front skirt, but not with the volume and style as in B5558. The back skirt of the inspiration is plain, though it has interesting seaming with the empire waist, a panel that goes to a little below natural waist, and the skirt below. I don't understand the panel and did not copy it. I would normally consider the plain back skirt a cheap coffin (lack of) detail, but here it seemed more sophisticated than a pleated back skirt. Luckily, with that well-drafted B5558 lining were skirt front and back pieces with only a set of darts (rather than the voluminous pleats) and cut in an A line.
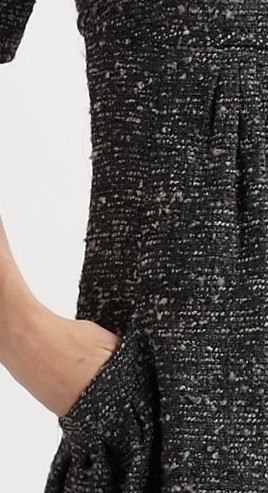
After the pattern was complete, I went to look at the inspiration piece again. This time I noticed the curved seam detail on the skirt, which opens into the pocket. B5558 actually has pockets, but they are standard side seam pockets. Back to the drawing board, literally!
On the original, the curved princess piece has gathering into a single-welt-looking banded pocket. However, with my rather stiff fabric I needed to avoid gathers.

Using the pieces from my Burda 10-2007-119 seamed frilled coat as a guide, I drafted a curved princess seam onto the skirt front lining pattern. The side front has an integrated pocket piece, and a separate pocket is sewn on to the skirt front.

I was actually a little puzzled about how to sew this, even though I'd done it for my coat. It was so long ago that I couldn't remember. Then when I was in Savasana (I'm not a very quiet-minded yogi) it came to me that it's sewn exactly like a side seam pocket, except even easier because you don't have to clip into the back's seam allowance. First sew the separate pocket piece onto the center front (here I used the "right" shiny side as the right side of the pocket to make the pocket a little easier to slip my ID badge in and out of). Press the pocket outward. Then lay the side front piece over the front, right sides together. Easy. The seam allowances are pressed toward the front together. I may use this detail again in the future, as it is sneakily easy.

To have room for the front pleats, I placed the "cut on fold" line of the front skirt (lining) piece 6 inches from the fold of the fabric. When I was putting together the dress, I was annoyed with myself that I didn't think to line up the curved side/pocket seam with the bodice dart. But then I had the idea to line up the outermost pleat with the bodice dart and all was well.
The lining I placed 3 inches from the "cut on fold" line so as to ensure biking room; I did a single box pleat at CF on the lining.
The skirt as drafted is so short! I lengthened it an inch in cutting, and ended up doing a serger rolled hem so I didn't lose any length. It's just about right--with zero hem allowance taken up. And, people, remember that I am 5'1"! If I made this again, I'd add 2 1/2 inches to the skirt for adequate length and hem allowance.
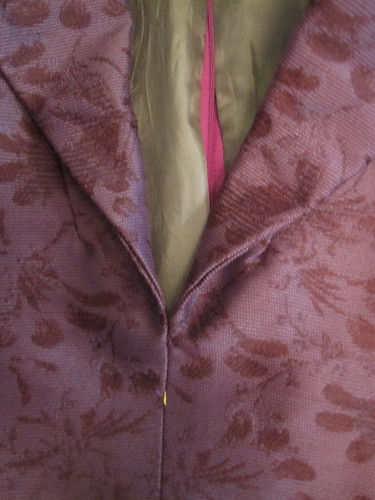

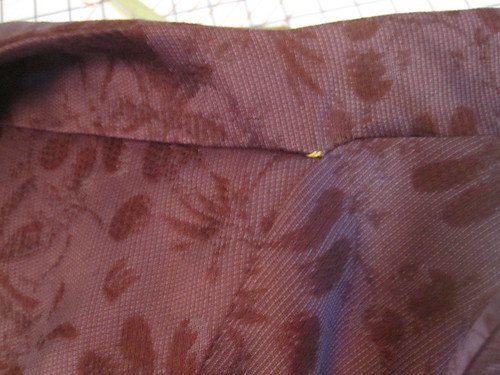
In addition to the short skirt, the bodice is very low cut. Butterick is getting sassy in its old age, apparently. The tailor's tack shows the original depth of the V opening; you can see on me that my 3/4" did not raise it to any kind of prudish level. Someone with an actual bust would have to raise it significantly more.
The pattern comes in sizes 6-20. I cut my usual 6 at the shoulders and bust. It was the right size for the shoulders, but I could have used an 8 at the bust and an 8/10 at the ribcage(!). The size issue is almost certainly due to my extensive redrafting of the bodice, though I would guess that this pattern does not suffer from the usual Big 4 Ease of Doom. (The extensive bust gathering will give a small bust Empty Sack Syndrome, however.)
Despite my Broad Back Adjustment, I do not have a ton of arm movement. The shoulder is more or less where it's supposed to be, though I could shave a little bit off the front armscye. I think it just needed more than an inch of BBA, which is kind of ridiculous. Again, this might have to do with my front bodice redrafting/SBAing, but the side seam sits pretty much exactly on my side so I'm not totallyconvinced.
Once the pattern was finally complete, which took probably 4 hours over several days, cutting and sewing were almost anti-climactically easy. The instructions for the bodice are good, though they don't tell you which way to press seams, which annoys me. All the seams I needed to know about were shown in later line drawings pressed, but it would have been nice just to have it spelled out (in case you're wondering, the shoulder is pressed open, but the back neck seam it continues onto is press down, so you need to clip the seam allowance).
The bodice front is cut with the integrated wing collar extending into back standing collar, so you need to accurately mark everything to line up the inner shoulder/neckline intersection. I used tailor's tacks.

To get a neat finish at the back neckline and avoid having the zipper go over a seam bump unnecessarily, I used the same technique as in Simplicity 2337 and stitched the center back seam closed from the top to about 2 inches below the collar seamline, and installed the zipper below that. The dress is a little hard to get in and out of because the empire seam catches on the bust when I lift my arms up and over to zip/unzip from the top. But that doesn't have to do with having the neckline closed at the top.

The fabric is a Maggy London brocade still available from Fabric Mart, though somehow I got it for $3.50/yd and it's now listed at $9.99. The fiber content is no longer listed on the website, oddly; it's wool blend. My guess is 30% wool, 60% rayon, 10% poly, but that is a total guess based on a burn test. It's a really nice quality, presses very well, and can take heat. I couldn't find a Maggy London piece made with this fabric. This Suzi Chin For Maggy Boutique Cap Sleeve Brocade Fit Flare Dress in Purple for $141 was the closest I could come; it's an acetate, though, so I think the wool blend probably comes from a more expensive line.

I actually used the "wrong" matte side of the fabric. I prefer my clothes to be work-appropriate. I just don't need fancy party clothes.
Alas, the finished dress definitely has a fancy party air because the skirt bells out in the rather stiff fabric. But I'll still wear it to the office because, hey, I am a fancy lady.

Even as I was setting in the sleeves (I used my generic woven sleeve pattern, derived from Burda; I measured the sleeve cap and armscye of the Butterick to make sure they'd work together), I was uncertain whether I should just make this a long sleeve dress, rather than copying the original. I decided that with the short sleeve it is a Fall, most of Winter, and early Spring dress and I would only not be able to wear it on the very coldest of winter days.
I turned up the sleeve hems, catching the sleeve lining, and then hand-stitched the hem to the lining only for an invisible look.
Now that they are in, I find the longer almost elbow-length sleeve surprisingly flattering.
This was a fun project, and the end result is an adorable dress, even if too fancy. I will enjoy wearing it!
All photos are here and the pattern review is here. I entered it in the RTW/Designer Knockoff contest on Pattern Review.
===============
Thank you, by the way, for the advice on returning fabric to Fabric Mart. I returned the two knits that were just the wrong colors for me and the overly metallic-ed linen. Two weeks after I returned it I still hadn't gotten a credit or heard anything so I contacted FM. I thought I had lost the tracking number from USPS for the package. They still said they'd process the return. I later found the receipt with the tracking number and sent it to them. I have no idea if it arrived, but hopefully they believe me that I actually physically returned the fabric and was not scamming them.
Although it was only 3 fabrics of the *ahem* many I have purchased recently, I feel so relieved! Everything else I love and have immediate plans for. These would have languished in stash, making me feel guilty and annoyed.
Although it was only 3 fabrics of the *ahem* many I have purchased recently, I feel so relieved! Everything else I love and have immediate plans for. These would have languished in stash, making me feel guilty and annoyed.


Comments
Post a Comment