Vogue 8728, Vintage Ruched Bodice Dress

I have had Vogue 8728 on my list for years. In fact, two years ago (or was it three?) I altered the pattern and drafted a stay for the ruched upper front bodice, though I ultimately decided that in my lightweight fabric it was better to underline the piece than to do an un-ruched stay. Every time I saw someone else make the dress, I was intensely jealous. And yet, somehow I was never into sewing it up. I really don't know why. Finally, I decided the time had come! The serger was threaded in white, and I am participating in the stash contest to move older pieces out.

This pattern is a vintage reissue, though Vogue doesn't say from what year. This photo popped up on Pinterest a while back, from a vintage shop (the dress has since been sold and is no longer on the website). It looked rather familiar! The Vogue is not an exact copy, but it was clearly in fashion when it was designed.
This dress needed self bias tape. I always use this continuous loop bias tape tutorial. It is a great method, but cutting apart the tube at the end is the worst part. It is both tedious and nerve wracking, because I'm always afraid I'm accidentally going to to cut into the wrong part.
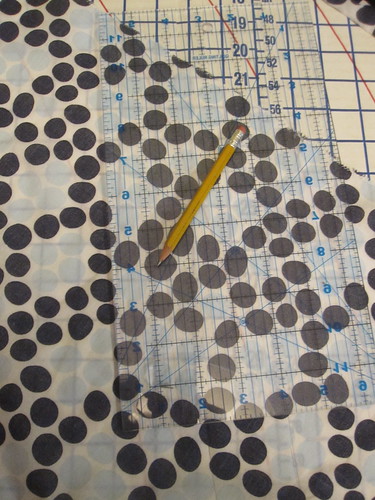
This time I had a flash of brilliance (though one that has been had before, I am sure!). I made my parallelogram and marked off my two inch bias lines, as usual. I find that a pencil marks well on almost all fabrics, and it doesn't matter that it won't come out because the only place there will be pencil marks is along the edges, which will be enclosed in any project.

Then, I used my rotary cutter to cut along my marked lines, leaving about a 2 inch uncut margin at each end. You MUST do all your marking before you start cutting. I think it would be fairly impossible to get accurate lines if you've started cutting the fabric apart.
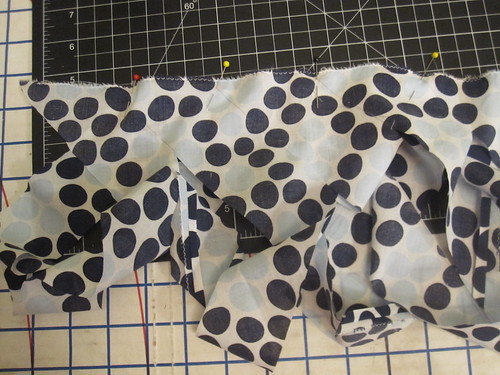
Next, I sewed it into a tube as usual, offsetting the bias tape at one end so as to get the continuous length. Please refer to the tutorial linked above for a full explanation. If you don't offset the ends, you will end up with lots of bias loops, not a continuous length.

Then I finished cutting along the lines. My two inch margins were rather unnecessarily generous. You could probably leave only 1 inch margins, though I am a scaredy cat and will probably still do 1 1/2.
I could not believe how much easier and quicker the cutting went. It took a fraction of the time it would take to cut apart a solid tube.
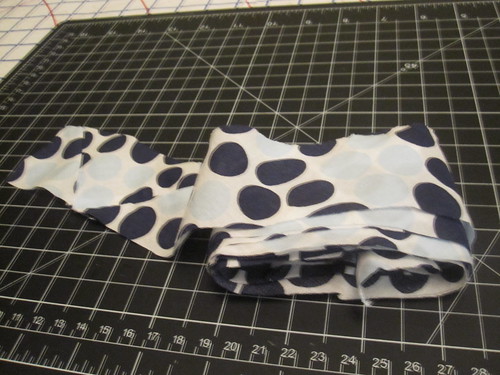
Not only was it faster, it was also more accurate. I always end up with skinny parts and fat parts when I cut apart the tube all at once, because it can be hard to see and follow the marked lines. With this, so much easier!!!! I will definitely be doing this from now on.

My polka dot fabric was very sheer, so I went with underlining rather than lining for the bodice. For the skirt I did a hybrid. I wanted pockets, and I didn't want the pocket bags to shine through the skirt. I cut the front pocket bag out of white batiste, and the back out of the polka dot, so it wouldn't be *quite* so noticeable.
I treated the skirt and lining as one for stitching in the pocket. Then I clipped into the seam allowances about an inch below the pocket, and stitched French seams in the two layers separately. This gives the skirt a nicer flow than if two layers were hemmed together at the bottom, but ensures opacity for the pocket.
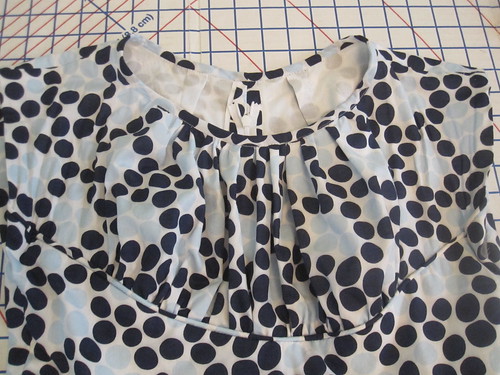
I added piping to the seam between the upper and lower bodice, using the tips and techniques shown here. It just seemed like it needed it to echo the neckline. I did not invent this; I know somebody has done this on this pattern before. I thought it was Joy of 21 Wale, but a quick look through Pattern Review isn't revealing it. It rather disappears into my print, but it makes me happy to know it's there.
I lowered the front neckline by 1 inch, as it was unflatteringly high. I think it could use a touch more.
I took two HUGE darts in the back neck. The dart width is 7/8", meaning each dart takes up 1 3/4 inch. The back neckline was *ridiculously* gapey. I do have a forward head and rounded upper back (aka terrible posture), but I don't see how anyone could wear that as drafted. I kept making sure the shoulder seams were exactly on my shoulders and not falling to the back because I didn't see how it could possibly be that bad, but they were placed correctly.
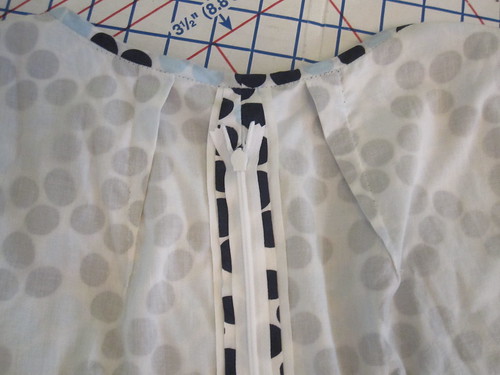
To get a continuous bias finish at the neckline, I started the zipper a few inches below the neckline at center back. The dress is not drafted with a CB seam, and it is designed with a side closure. I prefer a CB zip, so I just cut the center back with seam allowance instead of on the fold.

Because the bodice is underlined, I stitched the armscye hem to the underlining by hand for an invisible finish. This dress is meant to have shoulder pads and the distance from chest to shoulder is a bit tall. I should have shaved it down. The right shoulder was quite gapey so I took out about 3/8 inch of length at the shoulder, tapering to nothing at the neck.
I shortened the skirt 2 inches in cutting, and shortened it another two inches before taking a very deep 3 1/2 inch hem. It is drafted long!


I got this fabric in New York at H&M fabrics for $2/yard in November 2010, so it's been in stash for a while. Along with the bodice lining (cotton batiste), I moved 2 3/4 yards of fabric out of stash. And I finally have this dress!
I like it. I purposely left in a lot of ease at the waist. A cotton dress on a hot day is a nice comfort.
The design of the bodice is a little weird. I assumed that the curve of ruched upper front bodice would cup the bust, but in fact it cuts across it. For my small bust, this doesn't really matter, but it might look strange on a larger bust.
When I looked at these photos I was so confused, because my face is out of focus in all of them. My camera has facial recognition, which is a pain the patoot when using the self-timer because it takes forever to "find" me. I have to do gymnastics and position my face into every possible place in the frame before the self-timer catches onto my face and starts counting down. It went suspiciously well when I was taking these photos. Well, I'm pretty sure it was finding polka dot patterns it thought were my face. I once attended a presentation on facial recognition and they showed a soccer team photo where all the players' faces had been detected, but also the soccer ball's "face." At least the dress is in focus, right?
All photos are here and the pattern review is here.


Comments
Post a Comment