Butterick 5315, Piped Peter Pan Collar Shirtdress
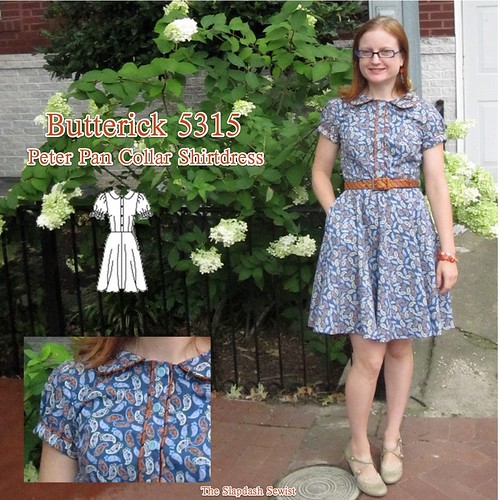
Butterick 5315 has been on my list for quite a while. I bought this fabric from G Street's special cottons table in March 2010 for $5.88/yd. I know I paired it with this orange tie silk at the time (the tie silk is from a bundle I split with Cidell in 2008), but I can't remember if I chose the pattern then or shortly after. At any rate, I've been planning to make this for two years, if not a little longer. In fact, I waited long enough that the pattern is now out of print. Sometimes it's obvious why a pattern went out of print, but this is actually (relatively) well-drafted with nice details that aren't too trendy. I don't know why they took this one off the market.
This is a standing-on-the-shoulders-of-giants project--I used a TON of techniques that I never would have worked out on my own:
-Front placket method from Silhouette patterns as pointed out by Dana of Lean Mean Sewing Machine.
-KBenco's Burrito method for yokes
-Side zipper with pocket technique from Simplicity 2497 (shown at right). If you have access to Simplicity sales, I think it's worth picking up this pattern solely for those instructions.
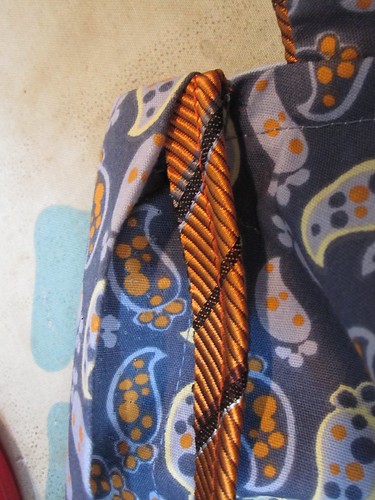
So my vision was piping. I wanted to pipe the collar, the placket, the back yoke, and sleeve bands. Some of this required redrafting, in addition to my usual Broad Back (remember to add width to both the back bodice *and* the yoke), Small Bust, and Swayback adjustments.
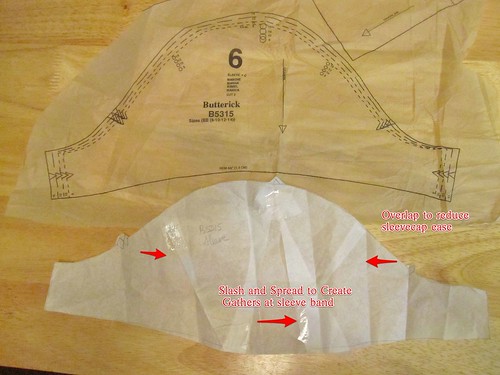
I took the provided cap sleeve and slashed it up the center, spreading to add volume to gather up at the hem. I also overlapped at the front and back sleevecap to reduce the ease. I know we all complain about this all the time, but they really do put a LOT of ease into a sleevecap in the Big 4.
This is drafted with a cut on placket. Since I wanted to pipe the placket I had to add a separate placket. The Silhouette method is to create a placket that encases a placket extension on the bodice, rather than being entirely separate. In the end, I'm not sure this was the right choice as I have difficulty buttoning the top button because of all the bulk in the buttonhole, but it worked out fine.
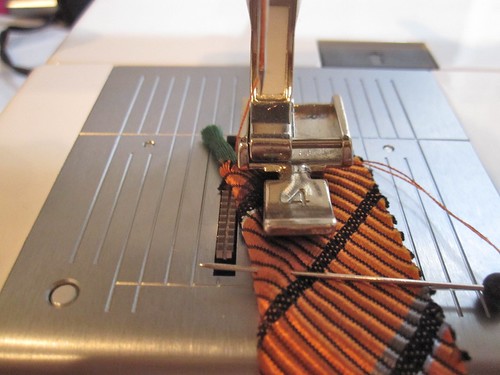
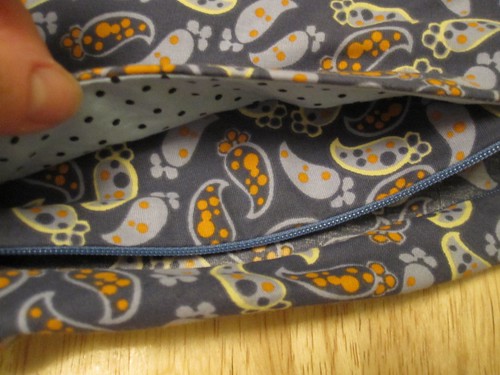
To make the piping I bias-cut my tie silk 1 5/8 inch wide, so that when folded over the cording it would be 5/8 wide, the width of my seam allowances. I used the continuous bias strip method to sew and cut it. For cording, I just used whatever rattail braid I had in stash. I used my zipper foot to stitch the braid into the bias.
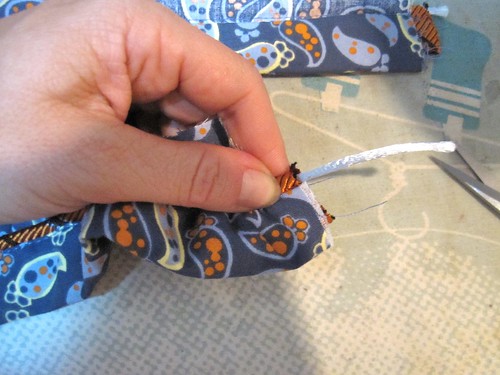
The issue with piping, other than just being a general pain in the @ss, is the bulk at the seam allowances. The trick here is that once you have cut your piping to size for your seam, you pull the cording out and cut an inch or so off. That way the piping is flat in the seam allowance.
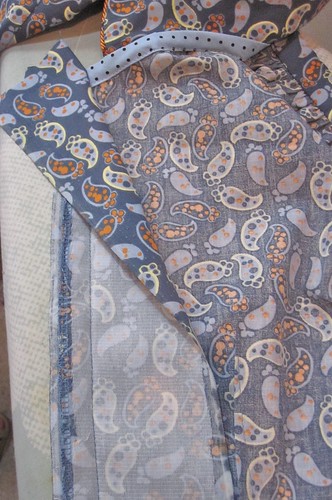
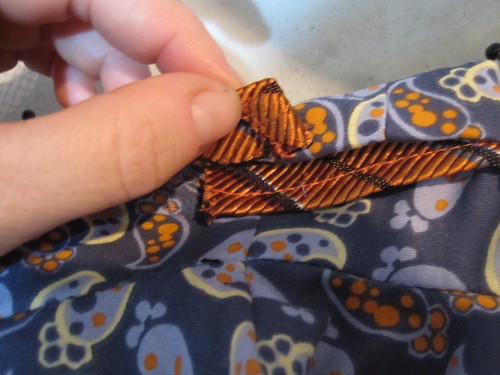
The biggest challenge with the placket was finishing the top edge. The collar on this dress is a standless Peter Pan shape that does not extend all the way to the edge of the neckline. Instead, the last inch and a half of the neckline is finished with the placket.
I first applied the placket to the inside of the bodice, right side of placket to wrong side of fabric.
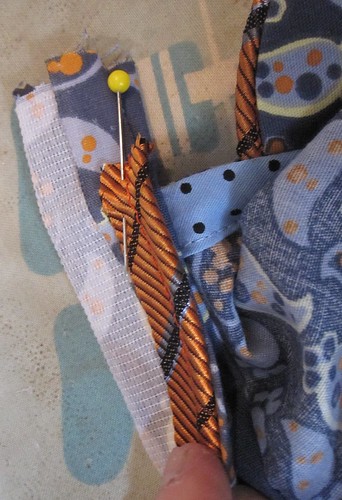
Next, fold the placket the long way down the center, right sides together. Fold the outer edge of the placket's seam allowance over this. Then place the piping on top of the folded-out seam allowance. Pin this whole mess together above the neckline, which has been finished with bias tape before attaching the placket.
Stitch right above the finished neckline edge, catching all layers of the placket.
Trim very close to the stitching. If you are me you will also zigzag, because I have a weird fanaticism and phobia about raw edges.
Now fold the placket over to the front, encasing that upper seam. Pin in place, positioning the piping.

Topstitch the placket close to the edge and piping.
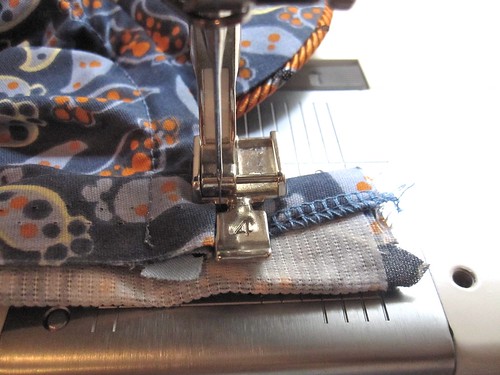
I used essentially the same method for the sleeve. I originally cut the sleeve band with two inches of ease above my bicep measurement but when I finished it, I was just afraid that it was too tight--the tie silk for my piping fabric is quite thick and added a lot of bulk. So I had to rip it off and add another inch to the sleeve band. In the end, I think it was more the nature of cap sleeves and a slightly restricted back (despite my broad back adjustment!) but I would have been so annoyed with myself had I left the sleeve band as is and felt uncomfortable in the dress.
For the sleeve band, I stitched it first to the inside of the sleeve, then folded it over to the front and topstitched with the piping in place. To reduce bulk, at the underarm seam I cut the piping so that it would overlap by about 1 inch. I also trimmed the piping's seam allowance. I fray-checked the cut edges of the piping. I placed the lower layer of piping straight and then folded over the upper layer of piping 3/8 inch or so and then placed that on top. This was much less bulk than trying to stitch the piping right sides together and having a seam allowance there.
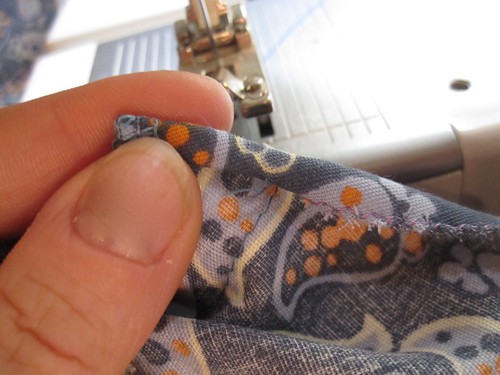
Because of limited fabric, I had to shorten the skirt. I wish I'd had just one more inch--I feel that the length makes this more Sally Draper than Betty Draper when combined with the Peter Pan collar. To preserve as much length as possible, I did a machine rolled hem. I find it easier to do this by the panel, rather than try to roll the hem over the seam allowances, so I opened out the seams for a couple inches above the hem.
There is a trick to using a machine rolled hem foot, and I'm not entirely sure what it is, LOL. I have worked out my own method.
The first thing is to zigzag the edges of the fabric. I find this necessary to get the foot to grab onto the edge of the fabric. Serging would be too wide and bulky here, so it's good ol' zigzag for me.
My method is to start by manually rolling the beginning of the hem in a double roll, about as wide as the foot will roll the hem. Place this manual roll under the foot and put in about 4 or 5 stitches.
This is the hardest part because my machine's feed dogs just don't play well with the rolled hem foot. It is very hard to get the fabric to run through the machine rather than just bunching and making infinite stitches in the same place. I find I have to be very proactive in pulling the fabric through the machine, even when past the beginning the stage. I don't know if that's common or normal.
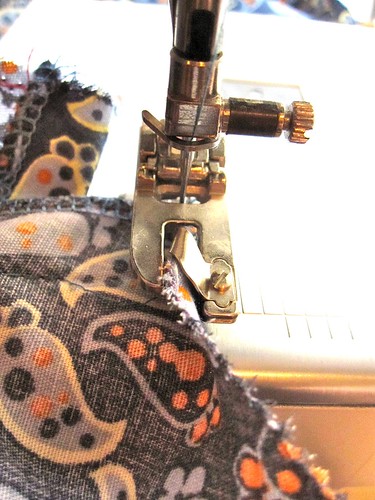
After you have secured your manual roll with a few stitches, with the needle down in the fabric, lift the foot. Then pull the fabric up into the foot, working it into the roll. Lower the foot and then continue stitching. Your manual roll and whatever bobble may occur at the beginning of the machine roll should be hidden in the seam allowance.

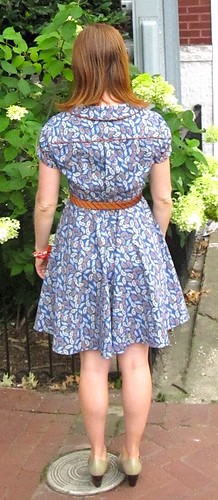
As I said in my last post (which has information on making a covered belt), I am now totally into the matching belt situation. I ordered from Sunni of A Fashionable Stitch and was very happy with her selection, prices, and especially her quick shipping. This is definitely not her fault, but the covered buckles being manufactured nowadays are much flimsier than the vintage one I used. It still seems ok, though. I put in brass eyelets because I felt they would match the orange better, without thinking about the fact that the hook on the belt is silver. Ugh! I painted it with gold nail polish and that seemed to work well enough.

 July was Pattern Review's Pattern Stash Contest. I chose this pattern because, as mentioned, I've been planning it forever. I kept putting it off because I knew it would be a lot of work with a lot of fussy details and I was definitely not wrong.
 I worked on this dress for three weeks, although I had very little sewing time over that period. The pattern adjustments and drafting the additional pieces alone took about 2 hours, then the cutting layout took forever because of limited fabric, and then sewing with piping just takes extra time and effort.
I put at least 12 hours into this dress (most projects take me closer to 8 hours). (I managed to get another dress made over the weekend, but won't be able to get it in on time to count for the contest.)
But, the dress is really cute and I'm sure eventually I'll forget how much work it was! I dragooned a photographer into taking outdoor shots because I am fancy.
All photos are here and the pattern review is here.
=======================
Thank you for all your support on the last post! I promise it was not my intention to post a rant and then disappear for a week, but I had family in town last week and then lost all of my photos for the past 3 years when my Mac's hard drive was replaced. Yes, I had backed up with Time Machine. But for some reason the one thing Time Machine didn't copy was my iPhoto library. It was pretty devastating. Luckily, I have a lot of things on flickr.
Anyway, I am aware of the irony that I am wearing a bit of a heel in these photos! I really appreciated Ripple Dandelion's comment that it is important for at least some of us to model healthy footwear. Our eyes are very trained to see only super high heels as attractive, because that's all we see in magazines and red carpets. By wearing healthy shoes in our photos, I do feel that we can offer a small counter-message. The heels in these photos are low and supportive, I promise! And there will be many more Danskos to come. Heh.


Comments
Post a Comment